The radar in CS2 plays an incredibly important role. Thanks to it, you can understand what is happening on the map, which helps you be prepared for different scenarios and adapt your actions. This is especially useful when you are playing alone and your teammates are not giving information.
That is why it is important for the radar in Counter-Strike 2 to be properly configured, so you can get the maximum benefit from it. You have quite a wide range of settings for this mini-map on the screen: you can choose which part of the map to display, how closely it should show your position, and also set its size.
In this material, we will go through the available radar settings options and provide recommendations on which ones are better to choose. However, the final choice will be yours, so you can adapt everything to your own preferences.
Preparing to Configure the Radar
When configuring the radar, you can use developer console commands, and for this, the console must be enabled. By default, it opens with the (~) key. If it does not work for you, then you need to enable it manually. To do this, go to the settings and find the “Enable Developer Console” option and activate it. After pressing (~), the developer console will open for you, and the key used to open it can also be changed through the settings.
Radar Settings in the Game
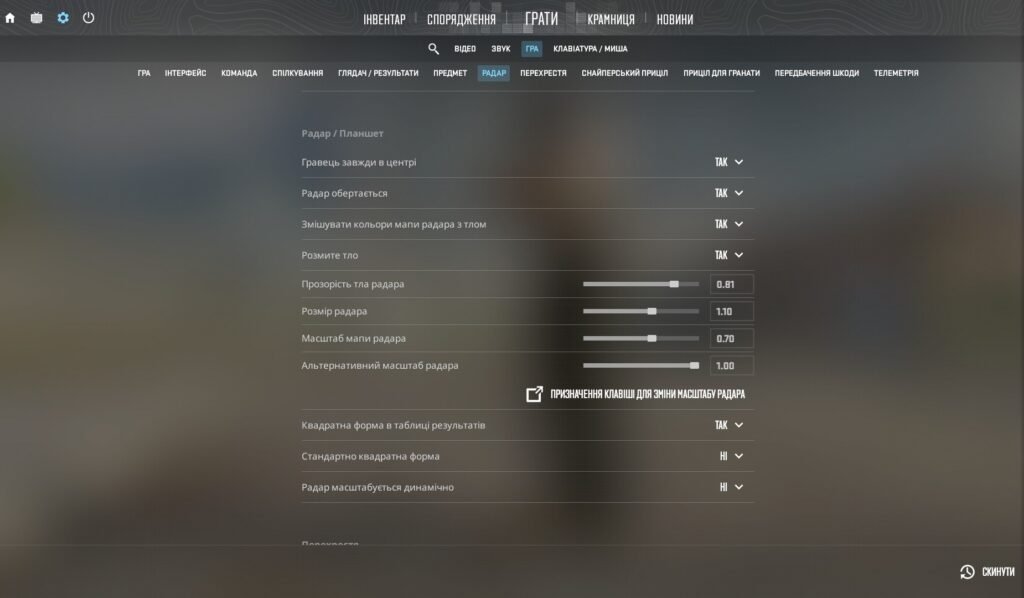
Let’s start with the settings that can be adjusted directly in the game, without using the developer console. To do this, open Settings, go to the Game section, and select Radar. There you will see the following parameters:
Always Center the Player: if enabled, your position will be fixed exactly in the center of the radar. At the same time, if you are standing at the edge of the map, part of the radar will show empty space. It is better to disable this function in order to use the entire radar space more effectively.
Radar Rotates: determines whether the mini-map rotates when you turn your crosshair (camera). It is better to keep this setting enabled so it is easier to orient yourself in space.
Blend Radar Map Colors with Background: this is a visual function that blends the radar palette with what is happening in the game behind it. Leave it enabled for better contrast.
Radar HUD Background Blur: adds a blur effect under the radar. Just like with the previous function, many players choose YES for better contrast, but this is up to your personal preference.
Radar HUD Background Opacity: affects the transparency of the radar background. You can make it completely transparent or fully black. It is better to choose a value close to 1 (~0.80 - 1.00) so that background objects do not interfere with reading information from the radar.
Radar Size: changes the size of the radar on your monitor. It is better to slightly increase the radar by choosing a value of 1.10 - 1.20.
Radar Map Zoom: determines the zoom level of the map itself inside the radar window. The lower the value you choose, the more of the map you can see. Many players consider this value the key setting for radar configuration and choose a value of 0.35 - 0.45, as this allows you to see the entire map while standing at spawn.
Alternative Radar Zoom: this is an additional zoom level that can be activated by pressing a special button. Thanks to this, you can quickly switch to an alternative zoom mode. Here, you can configure everything according to your needs and playstyle.
Square with Scoreboard: when pressing Tab, the radar expands, becomes square, and shows the entire map. Players often choose to enable this setting for easier situation assessment while opening the scoreboard.
Always Square Radar: makes the radar always square instead of round. Most players refuse to use this functionality, even though the square shape provides a larger view, because it covers too much of the screen during gameplay. That is why it is better to use the round radar.
Radar Centers Dynamically: affects the automatic scaling depending on the size of the specific map. Players and analysts recommend disabling this function, since during gameplay the interface should remain static and predictable, because you may not always have enough time to react to changes in it.
Commands for Radar Settings in CS2
Now let’s move on to the developer console. Above, we already explained how to open it. Through it, you can also configure the radar in CS2, although most of the parameters available through the console duplicate the settings available in the in-game menu.
cl_radar_scale: controls the zoom level of the radar map.
cl_hud_radar_scale: adjusts the size of the radar on your HUD. The optimal value is from 0.8 to 1.3.
cl_radar_rotate: controls whether the radar rotates in the direction you are looking. A value of “1” enables this function, while “0” sets a fixed orientation.
cl_radar_always_centered: if you set the value to “1”, the radar will center the map on your character. A value of “0” allows you to see a larger part of the map.
cl_radar_icon_scale_min: adjusts the size of player and bomb icons. The optimal value here is from 0.4 to 1.2. The higher the value, the larger the icons will be.
You can also use different binds that allow you to switch between different radar settings during a match. To set up a bind, you simply need to open the developer console and enter the required command.
Useful Radar Binds in CS2
bind "KEY" "incrementvar cl_radar_scale 0.25 1.0 0.25" — each time you press the selected key, the radar scale increases by 0.25, from the minimum value of 0.25 to the maximum value of 1.0.
bind "KEY" "toggle cl_radar_scale 0.35 1.0" — with one press, the radar scale becomes 0.35, and after the next press, it increases to 1.0.
You can set your own values so that they are comfortable for you. Also, replace KEY with the key you want to use.
There is also an option to configure a command where the radar increases only while holding a specific key. This command is adapted for Shift, but you can choose any key that is comfortable for you.
alias "+radar" "+sprint; cl_radar_scale 1.0"
alias "-radar" "-sprint; cl_radar_scale 0.35"
bind "shift" "+radar"
Radar Settings of Pro Players
If you want radar settings in CS2 like a professional player, here are the settings used by ZywOo and ropz — the leaders of the best team on the professional Counter-Strike 2 scene at the moment — Team Vitality.
ZywOo
Center Player on Radar: Yes
Radar Rotation: Yes
Change Shape with Scoreboard: Yes
Radar HUD Size: 1
Radar Map Zoom: 0.7
ropz
Center Player on Radar: Yes
Radar Rotation: Yes
Change Shape with Scoreboard: No
Radar HUD Size: 1
Radar Map Zoom: 0.65
We hope this CS2 radar guide helped you understand the settings better. At the same time, always remember that these are only recommendations, and you should test different parameters so they fit your own preferences and playstyle. Good luck on the server!